
Creating Artwork with Rhinestones, how to decorate cell phone and cell phone cases.
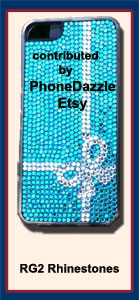 Everyday, we get at least 10 call pertaining to "How do I cover my Cell Phone or Cell Phone Cases with rhinestones." Well, it is easy, not expensive, and it is fun. If your phone is a flip-open type, consider the Top a 'canvas' to produce a piece of art on. You will need GemTac glue, a few applicator sticks, and a variety of colored rhinestones (all the same size). You may choose to do all the same color, mixes of colors, or actual designs with rhinestones. The final look is up to you. But, if you want to create a work of art that is unique to you and your phone, I suggest using different colors set up in patterns. For those of you who are "art challenged', then you will need some help. I choose 9SS or 10 ss stones to cover these phones, for this size allows great detail of pattern. If you choose to cover your phone in all one color, then choose 12SS stones, for application will go fast. BUT, I still prefer the smaller, more time consuming 9SS or 10SS stone.
The smaller the rhinestone, the less chance you will have in losing stones due to abrasion.
Use GemTac Glue because it is easy to use, here is one place that I do NOT recommend E6000 glue...will make a serious mess because of its rapid drying time.
Of course, the second most asked question I get is "How many rhinestones will I need to cover my phone". Now, short of being rude, How in the heck am I supposed to know what phone, what model phone, how much you want to cover, etc.??? You will need to measure the area you are planning on covering... Our Rhinestone Estimator, would be the easiest place for you to figure out how many stones you need based on the stone size you want to work with.
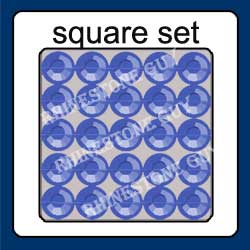
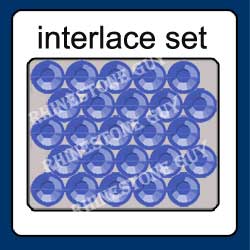 You need to decide whether you will placed them one next to each other, in a row... or Interlacing them (since they are round in a tight pattern). See the photos.
I suggest the 9SS or 10SS rhinestone for a good reason...they are NOT subject to much abrasion...the smaller the rhinestone, the less likely it is to be ripped off when handled roughly. Conversely, the larger the rhinestone, the more apt it is to be torn off, or separated from it's backing (leaving a very shiny silver spot where a rhinestone used to be. AND, you will be much more happy with the look of smaller stones (pave'' look as opposed to larger rhinestones)
IF you really want to get fancy, and if you have a very steady hand and good eyes, then go with a 5 SS or 6ss rhinestone for a phenomenal look! (This is the size that a very prominent purse maker uses to achieve those intricate designs that are over the Top!).
Another note to the general public: Your rhinestones will look best if set onto a black surface...the black will add contrast to your work and make it "pop". Do not paint the surface a color that matches the rhinestones, for the overall effect will not be as beautiful as working on black. I do not advise painting any cell phone. If it is silver, green, purple, whatever, so be it. The over spray can cause a problem. Either get a black cell phone or cover the one you have. No matter what color it is, it will be very sharp when you are finished.
Lap Top Computers, Personal Assistants, etc.: It really makes no difference what you are covering,the technique for determining the number of rhinestones required is the same as for a phone.
Generally speaking, the larger the area, the larger the stone you can use. You will get the most coverage for your dollar using 20SS rhinestones, but the smaller the stone, the more beautiful the project will be when finished. The value of used lapTops has fallen through the floor. The cover is a great pallet to paint with rhinestones. It is large, relatively flat, and can serve as a canvas to produce great pictures in rhinestones. Here, I would create a design on paper, cut out the design parts and reassemble on the cover. Outline each piece with a "Sharpie" pen, make notations as to color being used in that area, and lay out total design. Once the rhinestones are applied (use a small rhinestone to get good definition) you will have a note book that will be the envy of all who see it. And is certainly will be distinct, as no one will have one...so far, everyone is doing cell phones. Set a precedent, don't follow one. I strongly suggest laying out the cover as a real rectangle, ignoring curves that fall outside the rectangle. Do all stoning inside the drawn rectangle, then finish by fitting stones to fit the curves. You may use a smaller stone to make everything come out perfect. Mixing stone sizes inside the actual design is not a good idea, as the fit will fall apart very quickly. A large work of art will take some time. Do not worry that your note book will be out of use during this time, for it takes only about 4-5 hours for the glue to fully set. If you work on your lap Top at night, it can be used the next morning, and you can return to your project the next evening, everyday, more of the picture will appear. When you decide to replace your note book with a new, improved version, the rhinestones cannot hurt its resale value, for there isn't enough resale value to worry about in the first place. Why not enjoy the unit as a work of art as well as a functional computer while you own it. And, can you imagine your friend's reactions when you pull it from its case! Yes, I can too.
PDA's, IPods, any MP3 Player or CD Player lends itself to this treatment. But, always start on a square and fill in the outside edges with a stone size that works with what your are doing. If you start with a curve, your coverings will become a mess before you are finished. Other items that lend themselves to rhinestones: Sunglasses...use 5SS and/or 7SS rhinestones for the frames. Comb's: Use 5SS or 7SS to decorate. Compacts: Use 5SS/7SS/9SS to produce designs (make sure the compact is refillable) Lipstick Cases: Use 7SS or 5SS, make sure it is a sleeve that will accommodate whatever brand you use.
Technique of application:
What you will need:
• Rubbing alcohol
• Rhinestones - USE THE HANDY CALCULATOR
• at least one applicator stick ( $1.10 each from, who else! Rhinestone Guy)
• a sewing pin
• GemTac Glue
• a short-nap artist's paint brush that you can spread glue with.
• A bottle of Scotch, Gin, Tequila, whiskey, or several cans of beer (this is my technique, not necessarily yours) and an escape-proof room where you can lock up your kids whilst you are having all this fun.
Ready?
• First of all, clean the surface of all dirt, oil, etc. with a good wiping with an alcohol-dampened lint-free cloth. NO fingerprints, etc.
• Remove the cap from the GemTac glue and run a sewing pin down into the nozzle. Unscrew the lid from the glue and remove the paper cap liner, then replace the cap.
• Take the applicator stick and roll between fingers to produce a somewhat sharp point from the wax
• Dump your rhinestones into a small saucer. At least 50% will land right side up ...these are the stones we will be working with. We will worry about the stones that are wrong side up later.
• Have a drink (one sip...we don't want to get high too soon in this project)
• Deliver a few drops of glue to the upper left hand corner of your cell phone cover, then spread to a thin layer with the brush. Place the brush in water immediately. Spread ONLY enough glue that you can cover with rhinestones within one minute (Think NOT that you know more than I do, for if you spread too much glue, it will surface dry before you can set the rhinestones into it and your project will fail)
• Very lightly touch the tip of the pointed wax applicator stick to a rhinestone that is right-side up. The stone will stick to the wax. Place the rhinestone into the glue at the starting point. Gently roll the toothpick between your fingers as you pull back. The stone will release and remained in the glue. You can shove it around a bit if it isn't exactly where it belongs.
• It is obvious (at least to me) that you will want to spread a very small area of glue at first until you get the hang of what you are doing. You will develop a rhythm and can do larger areas as you go along. But, don't get in a hurry, for you are creating a work of art that all your friends (except one ...there is always that one, isn't there) will admire.
• Continue on this path until the project is finished, or you have drunk too much to continue. Allow the glue to dry for about 24 hours. All the glue will turn clear (trust me on that one).
Caution: Do not put down too thick a layer of glue. You want the glue to just capture the edges of the glass stone, not cover the stone. Too little glue will cause a loss of stones, too much glue will cause a dulling, and will get worse with time, as dirt will stick to the glue. Now that you are an expert, it is time to tackle a real artsy project. You can produce pictures with rhinestones. You can produce designs using different colors, only your imagination can limit you in what you do and what you want to cover. Producing a rhinestone buckle is done the same way described above. Go for it and have a ball.
I hope this has been helpful..... This method can be carried to much more detailed projects with a few simple modifications.
For those of you who cross stitch, you can set up patterns on graph paper using colored pencils. Choose colors that correspond to rhinestone colors. (Get yourself a rhinestone color chart, has all the colors and sizes available), then produce a pattern that you like. Start your project by drawing a center line and a center line perpendicular to the first line so as to divide the project area into 4 quadrants. (Make sure the lines are perpendicular). Now, by counting, you can place rhinestones of whatever color where the squares of the graph paper indicate. When you are finished, you will have a work of art. This can be done on compact covers, cell phones, purses, whatever. I have done this on the back of my motor cycle to create a large eagle in rhinestones...very impressive!
REMOVAL of Rhinestones/Acrylic Glue: you can try Goof Off or Acetone ...these products will, with enough time, dissolve most acrylic glues. But either might damage plastic, so test well before using. I strongly advise using rubber gloves when using either substance, for these products contain dangerous chemicals that can penetrate the skin and damage kidneys.
PLEASE NOTE: if you rhinestone your phone, you may well void your phone's warranty. If this is a concern, check with your provider before you do anything.